Looking for something in particular?

Friday, May 28, 2010

Ginger Tea + Easiest Jam Bars


TGIF:

How could things not go smoothly? After all, it is Friday. But, I should have known my best laid plans would have been better left alone.

Walking home from work I didn't notice the distinctly ominous mood prevailing over our little hedgerow of houses. Severe weather reports bubbled off my parent's television when I got inside. Great, I thought. But storms I could deal with considering that the weather reporters in my city are, at best, touch-and-go. What I wasn't expecting was the fire station to be called to my neighbors as I stood outside, key in hand, looking befuddled. The neighbors in question are away in Boston for the weekend and I had (gladly) agreed to watch their two charming cats like I do most summers. But, reaching for the laundry hanging on the door I noticed the alarm buzzing inside and, ever so softly, I heard the report issue over the radio at the fire station. After all, we live a meager half a block away. Within the 30 seconds it took me to call my neighbors the truck was pulling around the corner, siren and lights flashing. The siren, really?

Leading 3 middle-aged firefighters into the house, all of whom resembled very amiable teddy-bears, I couldn't help but notice that any strapping young firemen must have stayed in the truck or on the cover of a grocery romance novel. I suppose I didn't look startled enough to elicit "strapping bare-chested male rescuer". Thankfully there was no fire and no one had broken in, despite the ominous warnings on the security box. It was just a hiccup in the system. But as the truck drove away it took my resolve to produce something fantastic and inspirational with it. Instead, I could only pick up my most innocent looking cookbook, "Afternoon Teas". With beautifully illustrated pages it resembles a child's storybook with tidbits of history and snippets of tea time rhymes. I'm sipping a mug of ginger tea even now, swirling the little ribbons of lemon zest and feeling grateful it is finally the weekend.

An herbal tea, or tisane, is by the very definition, a drink brewed with anything other than the leaves of the tea bush(wiki, 1). Here I'm using powdered ginger but anything from mint leaves to rose petals would be fair game. (Believe it or not ginger and lemon are an ideal flavor match). For the bars I used lemon curd because we had an open jar in the fridge. For a less expensive option try any number of fruit jams. The original recipe suggests raspberry but blackberry or even apricot might be nice substitutes.

Ginger Tea
8-10 ounces water or more or less enough to fill you mug
1/4 teaspoon ginger
1/4 teaspoon honey or to taste
2-3 ribbons of lemon peel

Preparation:
1. Heat the water in a saucepan till very hot or boiling.
2. Wash a lemon and, using a pairing knife or zester, make long curls of zest. Be careful not to go too deeply into the pith (bitter white inner flesh).
3. Add the ginger, lemon peel and honey to the mug.
4. Pour in the hot water and stir until dissolved.

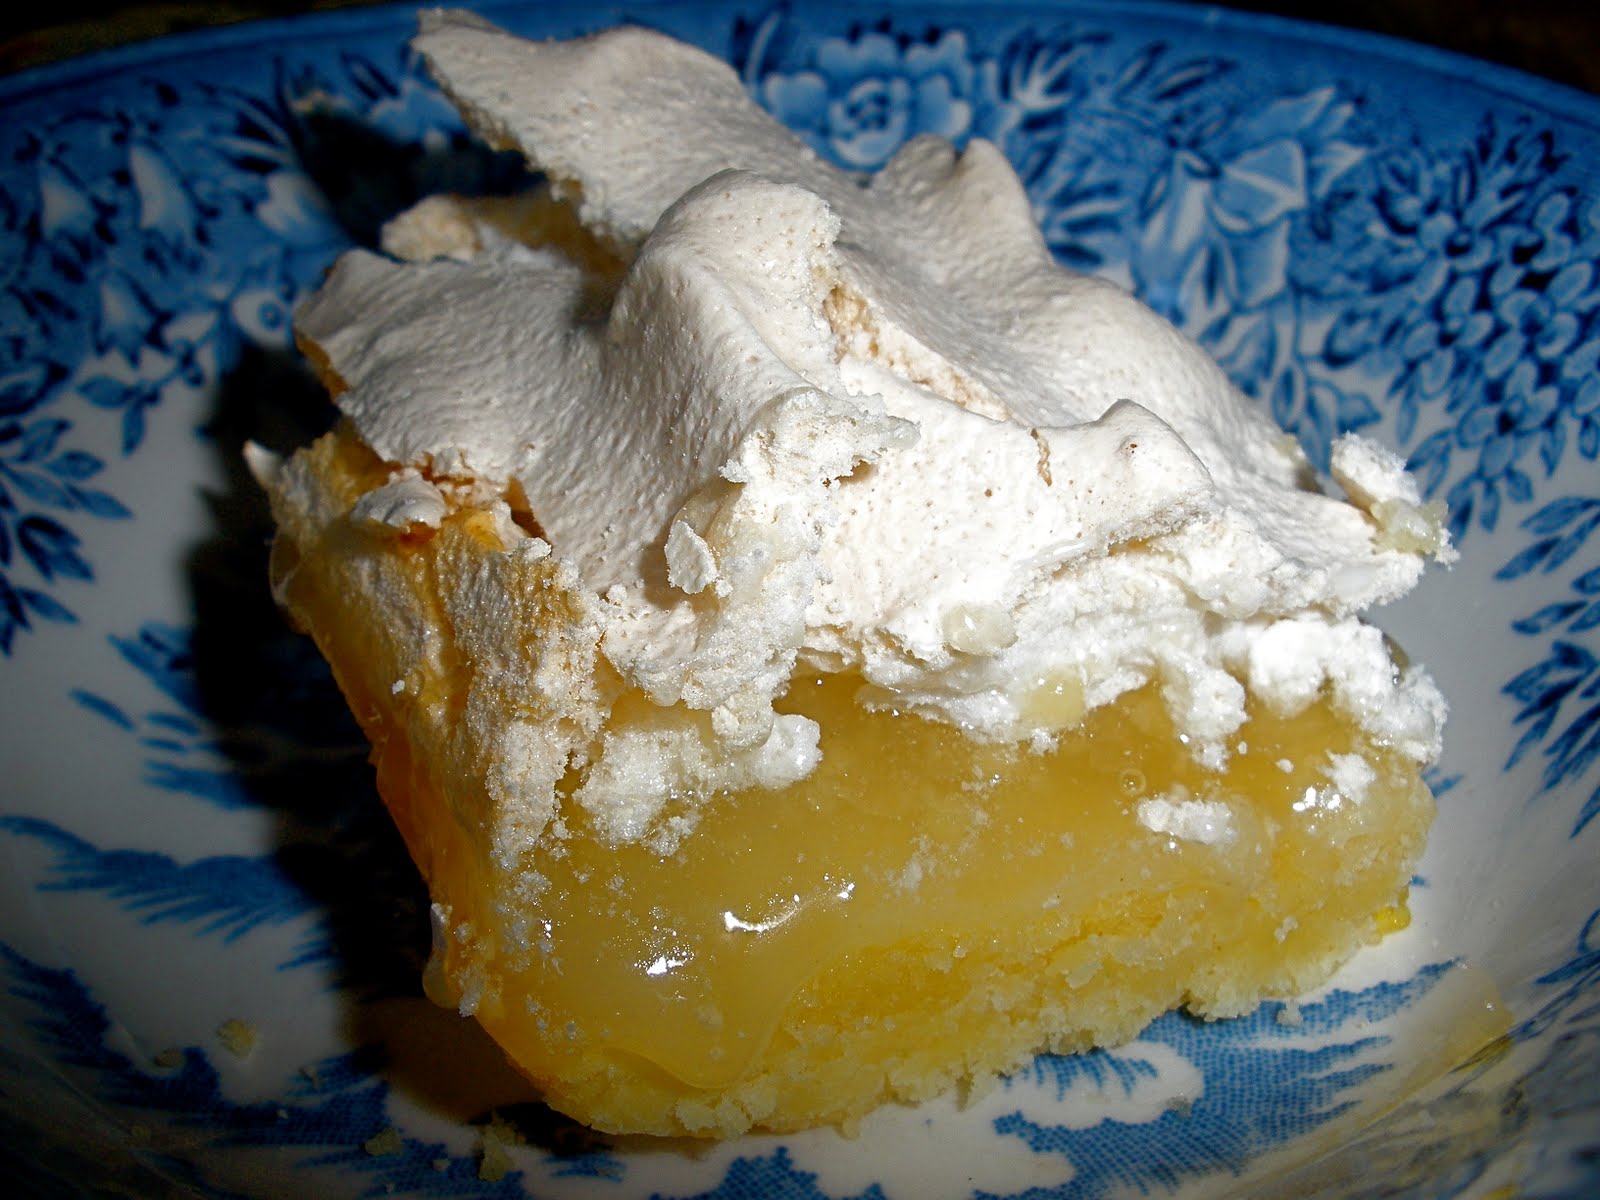
Easiest Jam (Lemon) Bars
These bars have delightful little shortbread bottoms and an elegant meringue top that will be lightly browned and cracked.

Ingredients:
1 stick (1/2 cup) butter
1/4 cup + 1/2 cup sugar, separated
2 eggs, separated
1 1/2 cups flour
1/4 teaspoon salt
1 jar fruit jam or lemon curd
1 teaspoon vanilla
2 teaspoons curls of lemon zest (optional)

Preparation:
1. Grease an 8 x 8" pan (or an 8" cake pan at your own risk)
2. Cream the butter and sugar with a fork. Add the egg yolks, reserving the white and beat. I use a wooden spoon here.
3. Mix the flour and salt into the butter mixture using a spoon or your fingers until it holds together, more or less. It will be a little crumbly.
4. Press the batter into the bottom of the pan. Try and compact it a little. Spread the dough with the jam or lemon curd. Warming stubborn jam in the microwave slightly will help spread it. (If you're using lemon curd I like to sprinkle some extra zest over it before covering it with the whites).
5. In a clean bowl beat the egg whites until fluffy with an electric mixer, about 2 minutes. If you have a whisk attachment now is the perfect time to use it. The whites should be thickened slightly.
6. Add the remaining 1/2 cup sugar slowly, still beating on high. Add the vanilla (clear vanilla is preferred here to keep the whites extra white). Continue to beat another 3-4 minutes or until the whites are shiny and cling onto the mixer when the whisk is lifted clear from the bowl.
7. Spread the egg whites over the jam or curd evenly. Then, dab the back of a spoon against the top of the whites to create peaks. These will puff up cheerily in the oven.
8. Bake for 28-30 minutes at 350. Watch for over browning. Cool completely and then cut into squares.

Thursday, May 27, 2010

Good Grief It worked

The art of shameless self-publicity:


"Fried Eggs"

It figures that my proverbial pants would be down when it finally happened. Has it really been a week since the last recipe post?! Yikes! But where are my manners? Old friends say hello to our new friends :-) Four followers means we can celebrate, yes?!

Unfortunately, a yummy new celebratory recipe will have to wait until tomorrow seeing as how I was recently reminded of just how busy college students are. I'm taking an accelerated 6 credit class at a local University (ahem, for fun I told myself) and somehow it managed to swallow up all of this weeks allotted SPUDS time. Don't worry though, after the initial shock I've got it all under control again. Monday night, slaving away to a mountain of assignments I put off in a marathon of hubris, I had to ask myself "how did I do it all?" But, the class is only 4 weeks long and what better way to get back into the college mindset than to wander around a campus again! Four hours in those plastic seats never felt so good I can assure you.

Instead of a recipe tonight I'd like to give you a little preview of what we have to look forward to next month. We're diving headlong into the world of eggs, whites to yolks. Absurdly affordable, filling and amazingly versatile eggs provide the perfect opportunity to learn new skills and re-invent some classics. Also, considering the season let's take advantage of the affordable and copious seasonal fruits and equally copious opportunities to have friends over for drinks or a casual cookout. Now is the time to invest in the cheapest little hibachi you can find! Next months recipes will be a cornucopia of picnic and classic Sunday dinner inspired recipes that are easy to store, simple to make and perfect for your next excuse to, well, party!

Here's what I have in mind:
  • cupcakes! + easiest icings
  • boiled eggs three ways
  • chocolate, chocolate, chocolate
  • chicken nuggets, baked
  • mashed potatoes, variation on a theme
  • egg whites: easiest meringue(s)
  • technique: "hobo packs" oven to grill
  • easy dips and spreads
  • punches, coolers and frozen fruit
I promise, this weekend will be as delicious as it is felicitous!

See you soon,
-The Fajita Bandita

Thursday, May 20, 2010

Blue Cheese Dressing

Men:

In a glass dish on my Mother's stove a block of half frozen, bloody pot-roast is thawing. Bloody not in the sense of "oozing fluids" but as in "damn is pot-roast ever good!" What? Yes, I do eat red meat. But, my carnivorous habits have been influenced by two distinctive forces. Firstly, I became less dining-hall dependent and my diet shifted away from chicken quesadillas and burgers and slabs of pork loin (which I also love) to in-season veggies, measure yourself grains and econo sized tubs of yogurt. This was partially because I could get a lot of veggies and fruit for $20 and largely because I function splendidly on things that taste like cardboard or have ridiculous fibrous tendrils and caches of vitamins. Secondly, I am not a 20-35 something male who lusts after red meat and bacon.

Yes, red meat and bacon. I was amazed recently when my boss (35) and my boyfriend (a fresh 22) both expressed powerful cravings for a particular blue-cheese-and-bacon-chain-fast-food burger on distinctively different occasions. Within the week both of them had consumed and raved about the flavors, the surprisingly delicious quality and, of course, the blue cheese and bacon crumbles. Really, that greasy patty with that run of the mill gummy little white bun?! Blue cheese and beef is not a new combination by any means but I was shocked at the immediacy, the sheer and inexorable passion they had to consume the burger. So much so that as soon as I saw the recipe for blue cheese dressing in "Bon Appettit Keep it Simple" (2002) I knew I would need to find an occasion to share it's moldy, pungent bounty.

Knowing that my boyfriend was visiting this weekend the pot-roast was resurrected from the freezer by my indulgent and forgiving Mother (forgiving because I could never consume the amount of food she would like to cook for me). And while I am never more happy than when my plate is steaming full of pot roast with the pile of mashed potatoes gurgling in frothy homemade gravy, with nary a sauce packet or cornstarch in sight, I think I can afford to extend my pot-roast repertoire a little. Call me generous, call me crazy but a small wedge of blue cheese is decidedly available to students at a reasonable $4.50. Compared to other cheeses a little goes a long way and it keeps well too. Plus, who doesn't have a packet of hot sauce in their fridge and a wanton jar of mayo? This dressing is simple and affordable with expensive steakhouse flavor.

The recipe below was for salad dressing but you may need to do a little tweaking. I am not a devoted fan of blue cheese, much less blue cheese dressing, and for me the consistency seemed a little thick. As is it is great for spreading on a burger or dipping celery and carrot sticks in but if you intend to drizzle you may need to think the dressing down. A few slices of crumbled bacon would also make a great salad addition. I added a 1/4 teaspoon spicy mustard because I can't get enough of the stuff. And while I will not go into the simple but delicate art of a good pot roast here today... the next time your parents try and send you back to school with an arsenal of freezer leftovers, don't pass up the pot roast or the homemade hamburger. You're never less of a man for having full freezer.

Shopping List:

Sour cream, 8 ounces
Blue cheese, as many ounces as your budget can afford
Worcestershire sauce (if you don't have any already)
Parmesan cheese
Quart of Milk or Buttermilk*
*the original calls for a 1/4 a cup, a measly amount but you may need to add more to attain your desired consistency

Ingredients:

1/2 cup mayonnaise, scant
1/4 cup plus 1 tablespoon sour cream
1/4 cup milk/buttermilk (maybe more)
1/2 teaspoon Worcestershire sauce or (I used soy sauce the first time)
1/4 teaspoon vinegar
1-2 tablespoons finely grated Parmesan cheese
1/4 teaspoon spicy mustard
dash hot sauce or cayenne pepper
1/2 cup blue cheese, crumbled
chives or parsley, finely chopped(optional for garnish)

Preparation:
1. Mix the sour cream, mayo, milk, Worcestershire sauce, vinegar and hot sauce in a small bowl.
2. If you are using a wedge of cheese cut the rind away (this is the powdery looking hard outer layer that protects the cheese) and discard. Add the crumbled blue cheese and fold gently. Serve over a salad or with your favorite burger.


Monday, May 17, 2010

Vanilla Cookie Crust

+ Poor Man's Lemon Tart:

Remember when I told you to buy an anemic little pre-made crust for that Bacon Quiche a few months ago? No? Bless you. I still regret leading you astray so early on in our relationship but I was trying to hook the bacon-addicts. Please forgive me for attempting to exploit America's greatest culinary weakness in the interest of accelerating this little splodge of a blog. But, sweet tart and pie crusts are a different matter entirely.

What could be simpler than crushed cookie crumbs and melted butter? Not even those temperamental store bought crusts that need to thaw and be gingerly unrolled before you patch up tears and snags to finally get the stuff into the pan. Also, these cookie crusts are extremely versatile. Gram crackers, ginger snaps, oatmeal, even chocolate cookies are suitable choices. In the name of simplicity I am using vanilla wafer cookies, the round kind you find hiding in banana pudding, but ginger or lemon snaps might be a nice alternative.

Basic Vanilla Cookie Crust:
  • For a 9" pie dish or tart pan - (1) 12 ounce box vanilla wafer cookies, 6 tablespoons melted butter.
  • Preparation: Pulse the cookies in a food processor until finely ground. Alternatively, put the cookies in a plastic freezer bag wrapped in a towel and crush with a rolling pin. Melt butter in a microwavable bowl and stir into cookie crumbs with a fork. Press into the pie dish or tart pan. Using the bottom of a juice glass is helpful to press it into the sides of pan. Bake in a preheated 350 oven for 10-15 minutes or until slightly brown.

Now the fun part, deciding what to fill this little gem up with. There are hundreds of venues to explore with regards to tart fillings (fruit, chocolate, ice cream even grains like grits or rice). But, let's begin with a very simple and inexpensive lemon tart adapted from marthastewart.com In place of the "expensive" ricotta, normally $3 for a small carton, I used pureed cottage cheese. It has the same tartness without the price tag. That is not to say splurging on a little ricotta isn't the perfect accoutrement to a bowl of spaghetti with meat sauce. But, in this case cottage cheese is the perfect supplement. I am inclined to add a 1/2 teaspoon of vanilla extract to the filling but this is purely optional. Incredibly fresh with the tart flecks of lemon zest this dessert is a simple, impressive tart that doesn't leave you feeling stuffed or weighed down. Note: you will need a food processor and a microplane/zester for this recipe. A tart pan with a removable bottom is ideal but a glass/aluminum pie plate could be substituted.

Shopping List:
vanilla wafer cookies
butter
sugar
2 or 3 lemons
8 ounces cream cheese
1/2 dozen eggs
16 ounces cottage cheese (small curd, low fat is fine)

Ingredients:
(1) 9" cookie crumb crust (see above for prep)

Filling:
2 cups of cottage cheese, small curd
4 ounces cream cheese
2 eggs
1/3 cup sugar
1/2 teaspoon vanilla (optional)
2 tablespoons lemon zest
3 tablespoons lemon juice
plus extra lemon for curls (optional)

Preparation:
1. Prepare the crust as listed above. Press into a 9" pie plate or tart pan. Bake until just golden brown.
2. Blend the cottage cheese, cream cheese, eggs, vanilla, sugar and the zest and juice of the lemons in the a food processor.
3. Pour the cheese mixture into the hot tart crust and bake for 30-35 minutes. The filling will be set and beginning to brown slightly in spots.
4. Cool completely before serving. Dust with powdered sugar (optional) and a few extra curls of zest or a wedge of fresh lemon. Refrigerate leftovers.

Saturday, May 15, 2010

Tools: Lemons, lemons, lemons


The sexy fruit:

When I say lemon do you think of wiggly cubes of Jello or sugary, artificially flavored fountain beverages? Yes? Well stop it, right now. RIGHT NOW!

Instead, think of nearly transparent panes of sliced lemon meringue or a gentle but fragrant rain of zest. For being unfortunately lump shaped, undeniably sour and otherwise unappealing lemons are an exceptional fruit! Just so, my fledgling romance has only recently left the nest. (The most romantic garden accompaniment ... you guessed it Lemon Trees!)

A year ago, well two years ago really *gulp*, I could count the number of times I bought a lemon on one hand. Other than to clean a bunch of grapes or to better preserve that "luxury item" the avocado, lemons were anywhere but on my radar. On an especially AC-free afternoon I might drink a glass of lemon water but that was it. In fact, I stayed away from lemons on campus at every turn, especially those pithy wrinkled wedges that collected near the fountain drinks in a little bowl of tepid water and, in my germaphobic subconscious, Hepatitis.

That is until I had the most wonderful drink at dinner hours before the finale of my college career. Maybe the fact that it was my so to speak "last supper" made it all the more pleasurable. Regardless, the heavens parted and spilled forth the most delicious ginger-infused vodka and lemoncello concoction known to mankind. Everything from the zippiness of the fresh juice to the saucy curl of zest was perfect, pure undeniable and never-again perfection. The ginger-infused vodka wasn't half bad either!

But, I was being seduced by the lemon not an inspired vodka. *Focus* With hundreds of flavor pairings (eggs, fish, pies, frosting, sauces, chicken) lemons are easily your most economical garnish/ingredient/seasoning. The catch? It can be difficult to find a good lemon in a world of imitation juices and less than perfect harvests. That and unlike a jar of cinnamon or a bottle of chili sauce lemons don't keep forever. More than one ambitious attempt ended in my unused lemons turning into little puckered gray rocks that were totally inedible. But, not so these days! With the collection of easy tips from Martha and CookingLight (and upcoming recipes) no lemon will ever go to the waste bin without being zested, juiced, sliced and sipped to it's (and your) hearts content.

Buy a lemon that is... heavy with smooth bright skin with no brown spots

Before using...
the zest: wash the fruit (whole) with mild soap and water
the juice: roll the lemon on the counter pushing down gently with your palm
a lemon from the fridge:
or
a tough lemon: microwave the little booger for 10-20 seconds to get the juice flowing

Uses:
Disinfect fruit: 1 large bowl water + juice of 1/2 a lemon + 1/4 tsp salt
Reduce bloating: 1 glass water + 1-2 slices lemon
Clean stainless steel pots: scrub with 1/2 a lemon, cut side dipped in salt
Lemon-sugar: add lemon zest to a small jar of sugar and store, use as a garnish or in sweet recipes
Brighten veggies: add the juice or zest to almost any green veg (broccoli, green beans, spinach) just before serving
Perfume: dab lemon juice on like perfume for an age old trick to smelling pretty and fresh on the hottest days
Open stuffy noses: add slices of organic lemon to a bowl of steaming water, cover your head with a towel and breath deeply for 10 minutes (plus, you get a mini facial)

Thursday, May 13, 2010

Chive Baked Eggs


Egg + Herb + Cheese + Oven = Baked Eggs:

The first game I bought after graduating was a darling little used copy of "Harvest Moon" for the Wii. I was skeptical at first, it set me back $35, but the priceless hours of play time were exactly that, priceless. When I felt, temporarily, like the world had gone black after graduation my little ranch was a safe haven with the predictable seasons, the notoriously lucrative harvests and friendly, if solitary, neighbors. A world where sushi, covered wagons and simple, wholesome displays of undying affection was a perfect world. One feature I found especially endearing was the ability to learn "recipes" to make things like Herb Fish, Strawberry Shortcake and Rice Cocktail. These yummy little dishes could be sold, along with a slue of farm products like butter or wool, or given as gifts to friends or secret heart-throbs. (Yes, you can get married). And while I never found someone to appreciate them as much as I did, my all-time favorite thing to cook in my cartoon kitchen were baked eggs.

Conveniently, "Bon Appetit Keep It Simple" (2002) seems to think baked eggs are a delicious go-to recipe for the everyday cook too! They are extremely inexpensive with only 3-4 ingredients and they take all of 15 minutes to make. The first time I cooked them my yolks were set to the point of being cooked through but they were no less delicious for not having a runny, silky smooth yolk to dip toast triangles in. And, in honor of Harvest Moon, I have added a little sauteed spinach and some cheese to Bon Appetit's recipe. A few slices of buttered toast and you are in business whether it is dinner, brunch or a late night breakfast. And as they say in Harvest Moon, "Baked Eggs is done. It looks great!"

Is this the beginning of a long tirade of posts inspired by the food eaten in video games... maybe. Is the recipe worth making regardless of it's hodgepodge of an origin... absolutely.

Note: Water Baths are often used to keep dishes especially moist and to help them cook evenly. It is essential that the water you pour into the dish is boiling, otherwise it will have to heat up in the oven which could affect the outcome of your dish!

Serves 2

Shopping list:
1/2 dozen fresh eggs
1/2 stick butter
1 package/bunch chives
Fresh spinach
2 Ramekins, 8ounce each (see your local home store or amazon.com)

Ingredients:

2-3 generous handfuls of fresh spinach
2 tablespoons (1/4 stick) butter, room temperature
1 1/2 teaspoons fresh chives, chopped finely
4 large eggs
2 teaspoons grated Parmesan cheese
salt, pepper

Preparation:
1. Beat the room temperature butter in a small bowl. (Zapping it in the microwave for a few minutes works just so long as you don't melt it). Stir in the chives and salt and pepper. I saved the extra to spread on English muffins or a fish fillet later this week.
2. Heat a small frying pan over medium heat. Add a teaspoon olive oil and then the spinach. Season with salt and pepper and toss until it is wilted. Remove from the heat.
3. Preheat the oven to a blistering 400. Set two 8 ounce ramekins in a small baking dish. Fill the baking dish with boiling water, about halfway up the sides of the ramekins.
4. Add 1 teaspoon of the chive butter to each ramekin. Set the pan of water with the ramekins into the oven for 2-3 minutes or until they are hot.
5. Crack an egg into a small bowl. Remove the dish from the oven and add half of the spinach to each ramekin.
6. Slide one egg into the ramekin, repeating until each ramekin has two eggs. (This seems excessive but it helps to prevent the yolks from breaking). Add a second little dab of chive butter to each egg.
7. Return the ramekins (still in the dish of hot water) to the oven and cook for 6-7 minutes or until the white is opaque and the yolk is set to the desired consistency. Remove the ramekins from the pan, drying the bottoms, sprinkle with a little extra salt, pepper and a sprinkle of Parmesan cheese. Serve immediately.

Tuesday, May 11, 2010

Basic Bechamel Sauce


Easy sauce for veggies, casseroles or pasta:

Shopping List:
1. Flour

2. Butter

3. Half gallon milk (whole or 2%)

4. Onion, 1 small

5. Optional: cheese (Cheddar, Goda or Parmesan), 3 medium potatoes


Most dining halls specialize in buttery gratins, cheesy scalloped vegetables and sinfully dense macaroni dishes. Even if the slab of pork loin you found under the heat lamp doesn't look edible no doubt the twice baked potatoes or a wedge of bubbling, golden brown baked macaroni and cheese will be. Despite the less than humble ring to it bechamel is a simple sauce that is the foundation for hundreds of staple dishes. That cheese sauce you spooned over your steamed broccoli, the broiled chicken breast or even the unidentifiable layer of creamy, cheesy delicious in your lasagna are bechamel based. So, the next time you're in need of a little comfort food look no further than the stick of butter and gallon of milk in your fridge. Welcome to the wide world of bechamel.

Pressed for time I often melted a little butter in a saucepan, tossed in some flour and a splash of milk straight from the fridge. Stir in a little cheese, maybe a spoonful of Dijon mustard or a sprinkle of nutmeg and I was ready to pour it over some pasta and maybe some steamed veggies. But, with age comes wisdom and a refining of technique. Heating the milk is essential to a smooth sauce and something I always cut out before. A little grated onion also amps up the flavor of this multipurpose sauce and a quick trip through a sieve does wonders to correct minor mishaps in the cooking process. Below is a very basic bechamel with a few inspired adjustments and additions. For a quick scalloped potato dish see the bottom of the page.

Ingredients:
1 tablespoon butter
1 1/2 tablespoons flour
2 teaspoons grated onion
1 cup milk (if using skim milk use a scant cup)
1/8 teaspoon salt and pepper
nutmeg

Preparation:
1. Peel the onion and grate 2 teaspoons worth into a bowl.
2. Melt the butter over low heat.
3. Heat 1 cup of milk in the microwave until steaming and hot. Alternatively, you can heat it in a separate saucepan.
4. Add the flour to the butter and whisk, cooking for 1-2 minutes. Add the grated onion and mix.
5. Slowly add the milk to the butter flour mixture (roux) whisking continuously. Season with salt, pepper and nutmeg. Keep whisking as the mixture begins to thicken, another couple minutes. If you're creating a simple cheese sauce now is the perfect time to whisk it in and whisk until it is creamy and delightful.

Easy scalloped potatoes
1. Preheat the oven to 325.
2. Wash and peel 3 potatoes. Slice 1/4" thick and layer in a small dish, seasoning with salt and pepper between layers.
3. Prepare the bechamel.
4. Stir in 1/2 cup cheddar cheese and a 1/4 cup grated Parmesan into the warm bechamel.
5. Pour the sauce over the potatoes. Top with a little extra Parmesan cheese and bake for 25-30 minutes or until potatoes are fork tender.

Wednesday, May 5, 2010

Pecan Crescent Cookies

Refrigerated dough part 1:
Yields 36 cookies

Monday, my day off, I reluctantly drug myself to the public library. Going to the local bookstore is out of the question this month. But, a safari into the musty crammed stacks seemed affordable. Up to my eyeballs in cookbooks I haphazardly scoped out titles, flipped through pages and digested average recipe prices and difficulty at a glance. After the better part of an hour I found just what I didn't know I was looking for: "Bon Appetit Keep It Simple" (2002). The book itself is cheery and minimalist with the beautifully styled photographs and friendly tips that we expect from Bon Appetit.

So it is under the dutiful guidance of that prestigious kitchen institution that we take our first look at cookie dough, not all of which comes from a tube and is best eaten post-haste at 1 am. (Although my senior year roommate heated the stuff up in the microwave and ate it with a little extra chocolate syrup and raved). This recipe for Pecan Crescents is one of the simplest doughs to make. Consisting largely of butter and flour there are no leavening agents to contend with and there is nary an egg in sight either! It also halves beautifully making a little over a dozen cookies (the full recipe yields 3 dozen). And while we all have a little flour, a stick or two of butter and some sugar lying around you need to plan ahead to make these little darlings. A buttery dough creates dense, smooth melt in your mouth cookies but it can be a pain to work with if not allowed to chill properly. Letting the dough to refrigerate overnight makes it entirely more cooperative. It also helps the cookie set up better when baked. I will not bore you gentle, innocent cooks with why. (That would involve a discussion regarding chemistry which I am really, truly rotten at). But, as with pie crusts just remember temperature is everything!

With graduation ceremonies comes the myriad of celebratory luncheons, picnics, cook-outs and dinners parents far and wide look forward to. Dusted with powdered sugar these scrumptious little cookies would be a welcome addition (or suitable hostess gift) at any function. Did I mention they were easy to make and inexpensive? They can even be kept for up to 2 weeks in an airtight container!

Ingredients:
2 cups all purpose flour, sifted
1 cup pecans, toasted
1/2 teaspoon salt
1 cup (2 sticks) butter, room temperature
3/4 cup powdered sugar
2 teaspoons vanilla extract

additional powdered sugar for dusting post-baking

Preparation:
1. In a dry pan heat the whole pecans over low heat. Toss periodically to keep from burning. When the nuts are toasted (ie. warm and fragrant about 4-5 minutes) remove from the heat and set aside to cool.

2. Sift the flour and salt in a separate bowl. Using a food processor pulse half the flour and the pecans together until combined. Alternatively, if you don't have food processor crush the pecans in a freezer bag wrapped in a dish towel using a rolling pin and then stir into the flour.

3. Beat the room temperature butter in a separate bowl with a spoon or cream with a fork. The original recipe calls for a hand mixer but the fork worked just as well. Add the powdered sugar and beat or cream until the two are combined.

4. Add the vanilla.

5. Gently fold in the flour and nut mixture. When all ingredients are combined divide the dough in half (molding it into a log like shape here helps) and double wrap in plastic. Refrigerate the cookies at least over night.

6. Preheat your oven to 325. Remove the dough from the fridge and allow to sit on the counter 10-12 minutes or until it just begins to soften. Pinch off a tablespoon of dough and using your fingers pinch and mold the dough into a crescent shape, keeping the edges smooth. Don't worry if it isn't perfect a perfect crescent, you will be dusting the cookies with powdered sugar later.

7. Bake for 18 minutes. Cool the cookies for at least 10 minutes on the cookie sheet then roll in powdered sugar, or, for a more delicate finish dust them lightly using powdered sugar and a fine sieve. Eat immediately with a glass of milk or store in an airtight container for up to two weeks.

Tuesday, May 4, 2010

Coconut Pancakes


A foray outside the box:
Makes 12-15 medium size pancakes

A few Christmas Eves ago I received a beautiful little cookbook called "Marie Claire Easy" (2005) by a very talented Michele Cranston. It is a delightfully small book with stocky little pages reminiscent of potbellies. At times some ingredients, like lemon grass, dashi stock and passion fruit, can be difficult to find and expensive but that is not to say each entry isn't thoughtfully arranged and beautifully photographed. Even if you never boiled a noodle using this little gem it would be worth it to have friends fawn over it while sitting at the counter as you whip up something a little less homemade.

But, there are a wide variety of simple recipes with basic, accessible ingredients. The first of these that I gave a whirl was that college breakfast/dinner staple The Pancake. The resulting cakes were dense, slightly sweet but still devilishly tender. Did I mention there is a recipe for pineapple syrup? Most mornings the whole reason I get up is to enjoy breakfast. During finals week, though, you need a little extra motivation and what better than coconut pancakes?!

I used to whip up pancakes for dinner the night before an exam, enjoy a few with some scrambled eggs, and wrap the rest up for breakfast the next day. Slipping them into the toaster (sans syrup) did wonders bringing them back from the soggy refrigerator state I found them in. And, wa-la, breakfast was served in under 5 minutes. That means I get to sleep in, right?

Ingredients:
*The original recipe calls for 2 bananas sliced but seeing how I was acutely out of bananas and pineapple (the accompanying syrup recipe sounds divine but will have to wait) I used a little flaked coconut. Strawberries would be a nice alternative as well if you have them on hand. I also can't make pancakes without a little vanilla so I've added that in as well. In retrospect, however, a 1/2 teaspoon of almond or coconut extract might have been nice and dare I say it... exotic.

1 cup self-rising flour (see how-to)
1/4 cup sugar (I used powdered)
1/2 teaspoons salt
1 egg
2/3 cup milk, scant
1 teaspoon vanilla
(1/3 cup coconut, 2 sliced bananas or 1/2 cup sliced strawberries)

How-to: Make your own self-rising flour using all-purpose. Add 1 1/2 teaspoons baking powder and scant 1/2 teaspoon salt to each 1 cup of all-purpose flour. Mix and sift as usual.

Preparation:
1. Heat a griddle or large frying pan over medium heat.
2. Sift the flour, sugar and salt into a bowl.
3. Measure the milk into the measuring cup. Add the egg right into milk and whisk with a fork to combine.
4. Add the egg-milk mixture to the dry ingredients. Add the teaspoon of vanilla and coconut (wait to add the fresh fruit) and fold until just moistened. Do not over mix! The batter will be a little lumpy and thick. That's fine. Over mixing will make the pancakes tough.
5. Let the batter sit for 10 minutes. Meanwhile, add a tablespoon of vegetable oil to the griddle or frying pan (or a spritz of cooking spray).
6. Add the pancakes a few at a time to the griddle. They will not spread and puff as much as boxed pancakes so be sure to spread them out a little. Cook for 1-2 minutes (look for bubbles rising to the surface of the batter) and then add your strawberry or banana slices if you are using them and flip. Cook for another 2 minutes.
7. Repeat with remaining batter. Serve warm with syrup or with a little butter and powdered sugar.

*Note: It is hard to get the temperature of the pan right initially. Try using a little spoonful of batter to test the pan before adding your pancakes. You want the oil to sizzle gently when you add the batter but not smoke and "spit". Even the best cooks sometimes have to throw out that first pancake.

Sunday, May 2, 2010

Aboard the Fail Boat

Blueberry cake fail x2:

Is it May already? Can someone tell me where April went?

Regardless, that means I have been posting for three months. I would consider this an achievement but for two reasons: 1) my only followers are two very faithful past roommates and 2) I just botched todays "Blueberry cake" recipe twice! The first time I made a batch of buttermilk and added the whole cup instead of just a half. And while that poor little leprous cake is still in the oven things aren't going very smoothly. From what I can see Round 2 is suffering from scrambled eggs, despite my efforts to temper them before adding the warm milk. Maybe I didn't scald the milk and butter long enough...

I feel truly wasteful and dejected. As if pouring the watery batter down the drain wasn't enough punishment now I have to watch 4 ounces of sweet, glossy blueberries go to waste. Did I mention they aren't cheap, despite the warm weather? But that gives me time to present my aims for Spuds during the month of May!

After reviewing the previous recipes I have broken them down into techniques and categories we can improve on (together probably considering my recent failures). Here's what I have in mind:

  1. Press in cookie crusts - BB (Basic Baking)
  2. Simple layer cake icings - BB
  3. Chilled cookie doughs- BB
  4. Basic Bechamel - ST (Stove Top)
  5. Sauteing - ST
  6. Eggs outside the frying pan - BB
  7. Scratch pancakes - ST
  8. Easy Party Nosh - Apps (Appetizers)
So that is where we are going these days. Oh and did you take the quiz yet? I'm tempted to start posting grocery lists too but you're going to have convince me! I have 8-10 recipes in mind and hopefully all of them will go smoothly...